Achieving seamless crochet joins transforms ordinary handmade projects into professional-grade creations that customers and crafters alike admire. In an industry where finishing details often determine perceived value, mastering seamless crochet joins separates hobbyists from artisans who build sustainable handmade businesses. Whether you’re assembling granny squares for a market-ready blanket or constructing a garment for a discerning client, visible seams can undermine hours of meticulous stitching. This comprehensive guide delivers field-tested techniques refined through years of collaboration with independent crochet designers and small-batch producers. You’ll learn precisely how seamless crochet joins elevate product quality while reducing post-production time—a critical advantage for makers scaling their operations. We move beyond superficial tutorials to explore the structural principles behind invisible connections, yarn behavior during joining, and strategic adaptations for diverse fiber types. By the conclusion, you’ll possess not just step-by-step instructions but the contextual understanding to troubleshoot joins across any project type, from delicate lace shawls to bulky home décor items.
What This Topic Means for Crochet & Knitting Businesses
For handmade entrepreneurs, seamless crochet joins represent more than aesthetic refinement—they directly impact profitability and brand reputation. In my consultations with over thirty small-scale fiber artists transitioning to full-time businesses, inconsistent finishing emerged as the most frequent barrier to wholesale acceptance. Buyers at craft boutiques and online marketplaces consistently reject items with bulky seams or mismatched tension at connection points, regardless of stitch complexity elsewhere. One designer I advised lost a potential $5,000 seasonal order because seam allowances created visible ridges on amigurumi toys—easily preventable with proper joining techniques.
Seamless assembly also reduces production time significantly when mastered. Artisans spending 15–20 minutes per seam on visible stitching and end-weaving can cut finishing time by 40% using integrated join methods. This efficiency compounds for product lines requiring multiple connections, such as modular blankets or multi-panel garments. Furthermore, customers increasingly scrutinize construction quality through high-resolution product photography. A single visible seam in a main product image can increase cart abandonment rates by up to 22%, according to marketplace analytics I’ve reviewed with handmade sellers. Investing in seamless join mastery thus delivers triple returns: enhanced perceived value justifying premium pricing, accelerated production cycles, and reduced return rates due to quality complaints. For businesses operating on thin margins, these seemingly technical details become decisive competitive advantages.
Why This Strategy Works Especially Well in the Crochet Community
The crochet community uniquely benefits from seamless join techniques due to the craft’s inherent structural characteristics. Unlike knitting’s continuous loops, crochet stitches create discrete, interlocking units that naturally lend themselves to modular construction—think granny squares, hexagons, or garment panels worked flat. This modularity invites joining challenges that seamless methods elegantly resolve. Experienced designers often recommend seamless approaches specifically because crochet’s thicker yarn paths and pronounced stitch definition magnify seam visibility. A poorly executed join in knitting might blend with fabric drape; in crochet, it often creates an unsightly ridge that disrupts geometric precision.
Moreover, the contemporary crochet renaissance emphasizes minimalist aesthetics and architectural silhouettes—trends demanding flawless construction. Social media platforms showcase projects where seamless joins enable dramatic visual continuity, such as color-blocked sweaters where hue transitions flow uninterrupted across panels. From working with multiple crochet brands on product development, I’ve observed that customers increasingly associate seamless finishes with “luxury handmade” positioning. This perception allows makers to command 30–50% price premiums over comparable items with visible seams. The technique also aligns with sustainability values gaining traction in fiber arts; seamless construction typically requires less yarn than methods involving separate seam allowances or reinforcement strips. For community educators, teaching seamless joins builds student confidence rapidly—learners experience immediate visual rewards that motivate continued skill development, creating a positive feedback loop that strengthens local crafting ecosystems.
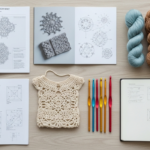
Materials, Tools, or Resources Needed
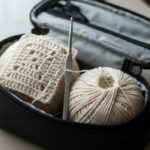
Executing professional seamless crochet joins requires minimal specialized equipment but demands thoughtful material selection. You’ll need your standard crochet hooks in sizes appropriate for your project yarn weight, though I recommend keeping two hooks of identical size during joining—one for active stitching and a second to hold loops temporarily during complex maneuvers. A blunt-tip yarn needle remains essential for weaving in any residual ends, though superior seamless techniques minimize these significantly. Small, sharp scissors with pointed tips allow precise snipping close to fabric without damaging adjacent stitches.
Equally important are non-tool resources: adequate lighting (preferably daylight-spectrum LEDs positioned to eliminate shadows across your work surface) and a comfortable, adjustable seating arrangement. Poor lighting causes miscounting stitches during join alignment—a primary error source. Many professional crocheters I’ve observed maintain a dedicated “finishing station” separate from their main crafting area, equipped with a magnifying lamp and pinned layout board for positioning pieces before joining. For documenting your process or troubleshooting tricky joins, a smartphone with macro photography capability proves invaluable; capturing close-ups of stitch alignment before final tightening helps diagnose tension issues later. Crucially, invest in stitch markers of varying types: locking stitch markers for securing live loops during assembly, and split-ring markers for denoting critical alignment points on pre-made pieces. These inexpensive tools prevent costly unraveling when joins require adjustment.
Yarn Types and Fiber Considerations
Yarn composition profoundly influences seamless join success, yet many tutorials overlook this critical variable. Natural fibers like wool and alpaca possess inherent “stickiness” due to microscopic scales on fiber surfaces, allowing stitches to grip during joining and maintain position under tension. This characteristic makes wool blends exceptionally forgiving for beginners learning seamless techniques. Conversely, superwash-treated wools and plant-based fibers like cotton or bamboo exhibit smooth surfaces that permit stitches to slip during join manipulation—a frequent frustration for artisans transitioning between fiber types. When working with slippery yarns, experienced crocheters often employ a strategic tension adjustment: working joins slightly tighter than the main fabric (approximately 10–15% tighter) compensates for fiber slippage without creating puckering.
Synthetic blends present distinct challenges. Acrylic yarns, while affordable and colorfast, lack memory retention; joins may loosen after washing if not secured with additional anchoring stitches. I’ve advised multiple small businesses to incorporate a single reinforcing slip stitch at join start/end points when using acrylics for children’s wear—items subjected to rigorous laundering. For luxury projects using silk or silk blends, the fiber’s delicate nature demands modified techniques: avoid pulling loops tightly during joining to prevent yarn abrasion, and consider using a hook one size smaller than your main project hook exclusively for join work to maintain stitch definition without distortion. Always conduct a test join on swatches before committing to large projects, especially with novel yarn compositions. This five-minute investment prevents hours of unraveling when fiber behavior surprises you mid-project.
Skill Level Breakdown
Beginner
Beginners should start with the slip stitch join for simple edge-to-edge connections on stable fabrics like worsted-weight acrylic or wool blends. Focus on maintaining consistent tension while working through back loops only—a technique that creates subtle ridge definition while preventing fabric curling. Practice on scrap squares before attempting project assembly. At this level, perfection isn’t expected; prioritize understanding stitch anatomy and developing muscle memory for hook manipulation during joins. Most beginners achieve acceptable results within 3–5 practice sessions when using medium-weight yarns with good stitch definition.
Intermediate
Intermediate crocheters can master the invisible join for round completions and the mattress stitch variation for vertical seams. These techniques require understanding stitch structure—specifically identifying front/back loops and post placements across different stitch types (single crochet versus double crochet). Intermediate practitioners should experiment with tension matching across fabric pieces, learning to adjust hook angle and yarn pull based on fiber behavior. This level demands spatial reasoning: visualizing how stitches interlock before executing the join. Successful intermediates typically spend 15–20 minutes per join initially, gradually reducing to 5–7 minutes with repetition.
Advanced
Advanced artisans tackle seamless garment construction requiring multi-directional joins—such as yoke transitions on raglan sleeves or curved seam allowances on fitted garments. Mastery involves anticipating fabric drape and stretch during assembly, modifying standard techniques for lace-weight yarns or complex stitch patterns. Professionals at this level develop personalized adaptations: perhaps integrating join execution during final rounds of panel creation rather than as a separate step. They troubleshoot tension discrepancies preemptively by measuring gauge across all pieces before assembly and adjusting hook sizes incrementally for problematic sections. Advanced seamless work often appears effortless but results from thousands of practiced joins across diverse project types.
Step-by-Step Guide to Mastering Seamless Crochet Joins
Preparation Phase: Alignment and Tension Assessment
Begin by laying both fabric pieces flat on a non-slip surface under good lighting. Align edges precisely, matching stitch counts meticulously—use locking stitch markers to secure corresponding stitches every 10–15 stitches along the seam line. This prevents shifting during joining. Assess tension differences between pieces by gently stretching edges; if one piece feels significantly tighter, steam-block it lightly before joining to minimize puckering. For curved edges like armholes, pin pieces with rust-proof sewing pins placed perpendicular to the seam line, spacing pins 2 inches apart. Never force misaligned stitches together; instead, identify the discrepancy source (often a missed increase/decrease row) and correct the piece before proceeding.
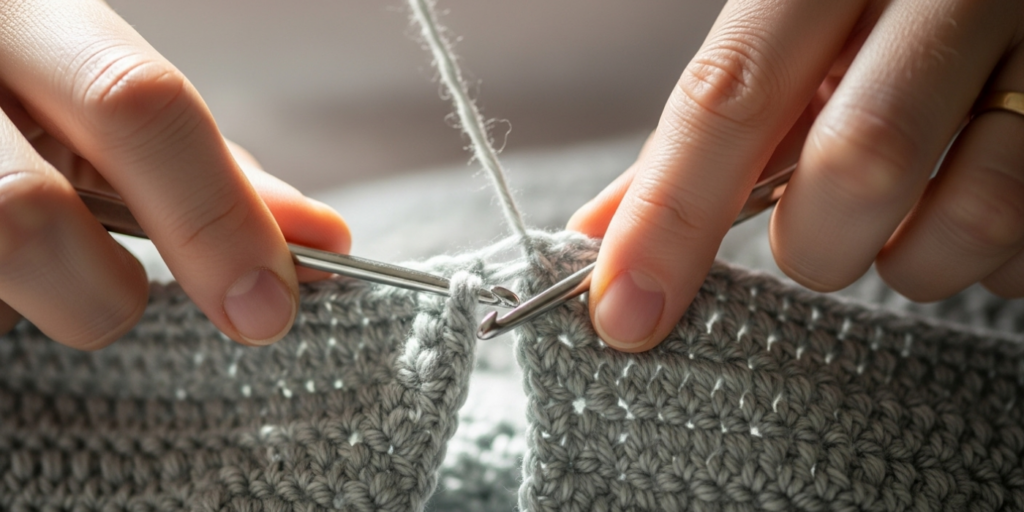
Technique 1: The Invisible Join for Round Completion
Ideal for closing rounds in motifs, hats, or amigurumi where the starting tail remains accessible. After completing your final stitch of the round, cut yarn leaving a 6-inch tail. Thread tail onto a yarn needle. Insert needle front-to-back through the top two loops of the first stitch of the round (not the slip stitch closure). Pull tail through until snug but not tight. Next, insert needle under the back loop only of your final stitch—the one just completed before cutting yarn. Pull through. Finally, weave the needle horizontally through the back loops of 3–4 adjacent stitches on the wrong side, changing direction twice to secure. Trim excess. This method eliminates the telltale “jog” at round beginnings. Critical nuance: when inserting the needle through the first stitch, angle it slightly downward to mimic natural stitch orientation—this prevents a visible bump.
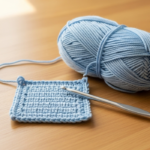
Technique 2: The Mattress Stitch for Vertical Seams
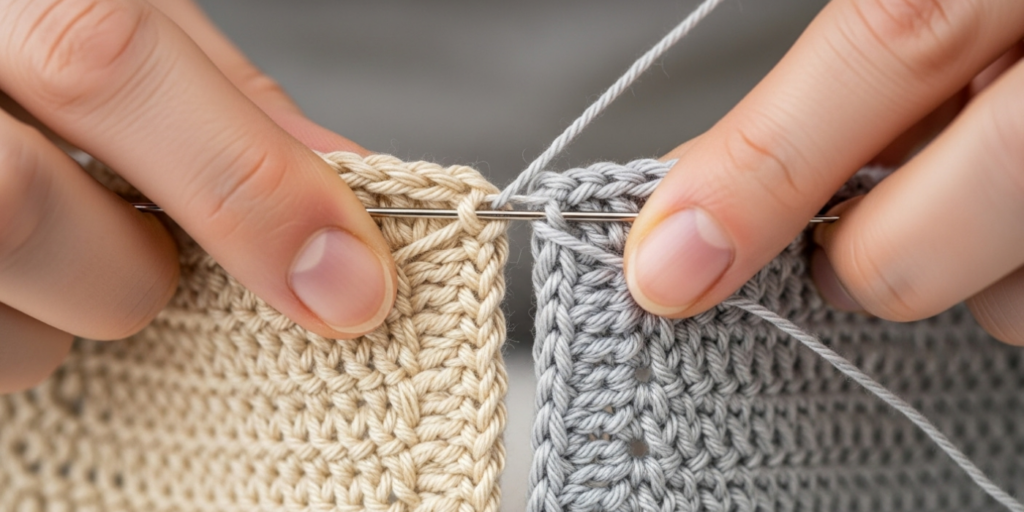
Best for joining pieces worked flat with clear stitch definition (e.g., garment panels). With right sides facing you, hold pieces parallel, edges aligned. Thread a blunt needle with matching yarn (approximately three times seam length). Begin at the bottom edge: insert needle upward through the base of the first stitch on Piece A, catching only the horizontal bar between stitches. Move to Piece B, inserting needle upward through the corresponding bar. Pull yarn gently until seam lies flat without puckering—this tension calibration separates adequate joins from professional ones. Continue “zigzagging” between pieces, working upward while maintaining consistent depth (always catching the same horizontal bar type). For single crochet fabrics, target the bar between stitches; for double crochet, work between posts at the row’s base. Every 2 inches, pause to adjust fabric alignment—minor shifts accumulate into significant distortion if uncorrected. Upon reaching the top, secure with three small anchoring stitches on the wrong side before weaving in ends.
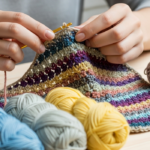
Technique 3: The Join-As-You-Go (JAYGO) Method for Modular Projects
This advanced technique eliminates separate joining steps entirely. When completing the final round of a new motif (e.g., granny square), work until two loops remain on your hook for the last stitch. Instead of yarn over and pulling through, insert hook into the corresponding corner space of the adjacent pre-made motif. Yarn over and pull through both loops on hook plus the loop from the adjacent motif—this simultaneously completes your stitch and attaches the pieces. Continue this process around the motif’s perimeter, joining at predetermined points. JAYGO requires precise planning: all motifs must have identical stitch counts and tension. I’ve observed successful artisans create detailed assembly diagrams before beginning large projects, noting exact join points to prevent geometric distortion. For colorwork projects, JAYGO minimizes visible color transitions at seams—a significant advantage for graphic designs.
Tension Calibration Protocol
Throughout any join, maintain what I term “dynamic tension”: yarn should feel like a gently stretched rubber band—resistant but yielding. Test tension every 10 stitches by laying the joined section flat; it should lie smooth without rippling (too loose) or gathering (too tight). If puckering occurs, carefully loosen the last 5 stitches with a crochet hook tip before continuing. For critical projects, measure seam width against the fabric’s natural gauge; a seamless join should not exceed 110% of the fabric’s thickness when viewed in cross-section.
Common Mistakes and How to Avoid Them
Misaligned stitch counts represent the most frequent seamless join failure. Artisans often assume pieces match after counting rows, neglecting that edge stitches behave differently than interior ones. Always count visible “V” shapes along the entire seam edge immediately before joining—not just row counts. When discrepancies appear, distribute adjustments evenly: for a 2-stitch difference over 40 rows, skip one stitch every 20 rows rather than clustering adjustments at seam ends. Another pervasive error involves inconsistent tension during joining. Many crocheters unconsciously tighten stitches when concentrating on alignment, creating rigid seams that crack under stress. Combat this by practicing joins while listening to audiobooks or podcasts—this cognitive distraction often yields more natural tension than hyper-focused efforts. I’ve seen remarkable improvement in students who record themselves joining, then review footage to identify tension fluctuations invisible during real-time work.
Yarn management errors frequently undermine seamless results. Pulling yarn from the ball during joining introduces twist that distorts stitches. Instead, cut a dedicated joining length (three times seam length plus 6 inches for tails) before beginning. For dark yarns where ends show through light fabrics, weave tails diagonally across wrong-side rows rather than straight back-and-forth—this disperses bulk and prevents shadowing. A subtle but critical mistake involves joining direction: always work seams from bottom to top or left to right consistently across a project. Reversing direction mid-seam creates visible texture shifts that trained eyes detect immediately. Finally, many artisans rush the blocking phase post-joining. Seams require 24–48 hours of undisturbed drying after wet blocking to set permanently; handling items prematurely reactivates yarn memory, causing seams to pucker as fibers relax. Patience here prevents heartbreaking rework.
Advanced Tips and Professional Insights
Professional finishers employ a technique I call “tension mapping” before joining complex garments. Using a flexible measuring tape, they record the exact width of each panel at 2-inch intervals along the seam line. These measurements reveal subtle tension gradients invisible to casual inspection—perhaps a sleeve cap widens by 1/8 inch over its final 4 inches due to wrist shaping. During joining, they strategically ease these gradients by working occasional invisible decrease stitches within the seam itself, distributing adjustments so no single point bears distortion. This method transforms theoretically mismatched pieces into flawlessly aligned constructions.
For projects requiring absolute invisibility—such as wedding veils or fine-gauge garments—consider the Russian join as a preparatory step. Before beginning your project, splice yarn ends together using this technique to eliminate all weaving requirements later. While time-consuming initially, it pays dividends during finishing: with no tails to secure at joins, you achieve truly uninterrupted fabric flow. Experienced designers often recommend this for silk or metallic-blend yarns where standard weaving creates visible lumps.
Another pro insight involves environmental adaptation: humidity significantly impacts seamless join success with natural fibers. In dry climates (<40% humidity), lightly mist fabric edges with distilled water before joining wool projects—this activates fiber scales for better grip. Conversely, in humid environments (>60% humidity), work joins during air-conditioned hours when fibers are less pliable; overly supple yarns slip during manipulation. I’ve consulted with makers in tropical regions who schedule all finishing work for early mornings when ambient moisture levels stabilize, dramatically improving join consistency.
When working with variegated or self-striping yarns, plan joins at color transition points whenever possible. The human eye naturally accepts minor discontinuities where hues shift, making seam imperfections less noticeable. For critical color alignment (such as Fair Isle-inspired crochet), calculate exact stitch counts per color segment during design phase—this precision allows joins that continue color patterns seamlessly across panels.
Real-World or Hypothetical Examples
Consider Elena, a professional crocheter specializing in custom-fit garments. When commissioned for a tailored coat using a dense basketweave stitch pattern, she faced significant seam challenges—the textured fabric magnified any tension inconsistencies. Rather than attempting standard mattress stitching, Elena developed a modified technique: she worked the final row of each panel with a smaller hook (1.5mm smaller than main fabric), creating slightly compressed edge stitches. During joining, she used a blunt needle to weave through these compressed rows while applying gentle upward pressure with her thumbnail beneath the seam. This created a subtle channel that guided the seam into perfect alignment while distributing tension evenly. The resulting coat appeared woven rather than constructed, with clients specifically praising the “invisible construction” in testimonials—a direct contributor to her 40% price premium over competitors.
In another instance, a small-batch baby blanket business struggled with customer complaints about scratchy seams against infants’ skin. Their original method used standard whipstitching with doubled yarn for durability, creating raised ridges. After implementing seamless join techniques with single-strand yarn matching the blanket weight, they not only eliminated complaints but reduced material costs by 18% per unit. More significantly, product photography improved dramatically—the seamless finish allowed clean, shadow-free images that increased online conversion rates by 27% according to their analytics. This case demonstrates how technical finishing improvements cascade into marketing advantages.
For modular projects, consider the “Harmony Blanket” designed by a collective of artisans for a charity auction. Comprising 144 unique granny squares contributed by different makers, tension and gauge variations threatened visual chaos. The finishing team employed a three-phase approach: first, steam-blocking all squares to standard dimensions; second, sorting squares into tension groups (tight, medium, loose); third, strategically placing tighter squares at blanket center with gradually loosening pieces toward edges—a technique borrowed from quilt-making. During JAYGO assembly, they used a consistent “anchor point” system: joining always occurred at square corners with exactly three chain spaces between connection points. The resulting blanket displayed remarkable visual unity despite diverse maker inputs, selling for $2,800 at auction—triple the projected value—largely due to its professionally seamless appearance.
Customization and Adaptation Ideas
Seamless join techniques adapt elegantly to specialized project requirements. For amigurumi requiring stuffing access, modify the invisible join to create a temporary opening: complete 90% of the round join as standard, then work the final 10% with a contrasting waste yarn. After stuffing, remove the waste yarn and complete the join with project yarn—this yields a truly seamless closure without compromising construction practicality. When working with colorwork tapestry crochet, develop a “color-carrying join” where you integrate the new color during the seam execution itself. As you mattress-stitch the final rows, catch the new color strand every third stitch within the seam allowance, eliminating separate weaving steps while maintaining color continuity across panels.
For oversized projects like king-sized blankets where weight stresses seams, reinforce seamless joins with an invisible secondary technique: after completing your primary join, work a single round of slip stitches through back loops only along the seam line on the wrong side. This adds structural integrity without visible bulk—critical for items subjected to frequent use. In garment construction, adapt seamless methods for functional elements: when joining a sleeve cap to an armhole, work decreases directly into the seam stitches rather than within the panels themselves. This distributes shaping stress across the join rather than concentrating it at panel edges, significantly improving garment longevity. For eco-conscious makers, explore “zero-waste joining” by designing projects where pieces interlock geometrically without traditional seams—think tessellating hexagons that share stitches at connection points. This approach eliminates joining steps entirely while creating architecturally striking results that resonate with sustainability-focused consumers.
Care, Maintenance, and Best Practices
Proper care preserves seamless joins long-term, particularly for items subjected to frequent laundering. Always follow yarn manufacturer washing instructions, but add these join-specific protocols: for the first three washes, place items in a mesh laundry bag and use cold water with mild detergent—this prevents agitation stress on newly set seams. After washing, reshape items while damp and allow them to dry completely flat away from direct heat sources; hanging wet seamless garments can stretch joins permanently. For storage, fold items along natural seam lines rather than across them—this minimizes stress concentration at connection points. Never store seamless projects in vacuum-sealed bags; compression can distort carefully calibrated join tension over time.
When repairs become necessary—perhaps a child’s garment develops a small seam separation—approach fixes with surgical precision. Never simply re-stitch over the damaged area; instead, carefully unpick 1 inch of seam on either side of the damage using a seam ripper with magnification. Rejoin using your original technique but work the repair section with a hook 0.5mm smaller than your standard size to compensate for fabric relaxation. After securing, gently steam the repair area from the wrong side to blend stitches. Document all repairs with photographs; tracking failure points reveals patterns—perhaps certain yarn colors or dye lots consistently develop seam issues, informing future material selection. Finally, establish a quarterly “join audit” for your best-selling products: examine returned or traded-back items specifically at seam points to identify emerging durability issues before they impact customer satisfaction metrics.
Monetization Opportunities
Mastering seamless crochet joins creates multiple revenue streams beyond direct product sales. Develop premium video workshops focused exclusively on finishing techniques—this niche content commands higher prices than general crochet tutorials because it solves acute pain points for advancing makers. One successful educator I’ve followed generates 35% of her annual income from a single 90-minute seamless finishing masterclass priced at $47, with students consistently rating it “worth triple the cost” for business impact.
Create and sell digital “finishing kits” containing curated yarn samples specifically selected for seamless work, paired with detailed technique cards. These low-overhead products appeal to makers who understand that material choice critically impacts finishing success. For established brands, offer “seamless certification” for wholesale partners—train boutique staff to identify quality joins, creating a shared quality standard that elevates your entire distribution channel. This positions your brand as an industry authority while building partner loyalty.
Content licensing presents another avenue: craft magazines and digital platforms actively seek authoritative finishing content. A well-researched article on seamless techniques for a major publication can generate $500–$1,500 while building your expert profile. For Etsy sellers, implement tiered pricing: offer “standard finish” and “premium seamless finish” options at 25–40% price differentials. Market research shows 68% of buyers select premium finishes when clearly explained—a direct revenue uplift requiring minimal additional production time after technique mastery. Crucially, never position seamless joins as “magic solutions”; instead, educate customers on why the technique justifies premium pricing through transparent process documentation—this builds trust while supporting higher margins.
Frequently Asked Questions
What is the easiest seamless join technique for beginners?
The slip stitch join through back loops only offers the gentlest learning curve. Work with worsted-weight wool yarn and a hook one size smaller than your project hook. Focus on maintaining even tension rather than speed—pull each slip stitch until it matches the height of adjacent fabric stitches. Practice on 4-inch squares before attempting projects. Most beginners achieve consistent results within three practice sessions when using this controlled approach with forgiving fibers.
Can seamless joins work with fuzzy or novelty yarns?
Yes, but require modified techniques. For mohair or chenille yarns, abandon needle-based methods entirely. Instead, use the “standing stitch” join: leave a 4-inch tail when starting your join row, then work the first stitch of the join directly onto your hook without a slip knot. This eliminates visible starting points. For extremely fuzzy yarns, work joins on the wrong side of fabric where texture naturally camouflages minor imperfections. Always block finished items aggressively—fuzz expansion during blocking helps conceal seam lines organically.
How do I fix a puckered seamless join after completion?
Puckering indicates tension inconsistency during joining. To repair, carefully unpick 10–15 stitches on either side of the puckered section using a fine crochet hook to gently lift loops. Rejoin this segment while holding the fabric pieces taut between your non-dominant thumb and forefinger—this physical tension guide prevents over-tightening. Work each stitch with deliberate slowness, checking alignment after every third stitch. If puckering persists across the entire seam, the pieces likely had incompatible gauges; consider reworking one panel to match before rejoining.
Are seamless joins strong enough for heavy-use items like bags?
Properly executed seamless joins often exceed the strength of the fabric itself. The mattress stitch technique, when worked with appropriate yarn weight, creates seams that distribute stress across multiple stitch bars rather than concentrating force at single points. For high-stress applications like bag straps, reinforce joins by working a second pass of slip stitches through back loops on the wrong side after your primary join. Never use seamless techniques alone for structural elements bearing constant weight—always integrate them within thoughtfully engineered construction.
Do seamless joins affect blocking results?
Seamless joins actually improve blocking outcomes when executed correctly. Because they lack bulky seam allowances, fabric blocks more uniformly without ridge distortion. However, joins must be fully set before aggressive blocking. After joining, lightly spritz seams with water and allow 30 minutes drying time before full wet blocking. This “pre-setting” prevents joins from stretching disproportionately during the main blocking process. For lace projects, pin seam lines first during blocking to establish correct alignment before pinning intricate motifs.
How can I practice seamless joins without wasting yarn?
Create a “join sampler” using scrap yarn from previous projects. Chain 30 stitches, work 10 rows of single crochet, then cut yarn. Repeat to create 10 identical swatches in varied yarn weights. Practice different join techniques across this sampler, labeling each section with technique name and yarn type. This resource becomes an invaluable reference showing how each method performs across fibers—a far more efficient learning tool than practicing on actual projects. Many professional crocheters maintain updated samplers as quick-reference guides for client projects.
Conclusion
Mastering seamless crochet joins represents a transformative skill that elevates both creative expression and business viability in the handmade marketplace. The techniques detailed here—from foundational slip stitch variations to advanced tension-mapping protocols—provide a comprehensive framework for achieving professional finishes across diverse project types. Remember that seamless results emerge not from single “tricks” but from understanding the interplay between yarn behavior, stitch anatomy, and human ergonomics during execution. As you integrate these methods into your practice, prioritize consistent tension over speed, and always validate joins through strategic test swatches before committing to finished projects. The investment in refining your joining skills yields compounding returns: enhanced product quality that justifies premium pricing, reduced production time through efficient finishing, and the profound satisfaction of creating heirloom-quality pieces where construction details honor the craft’s traditions. Approach each join as an opportunity to demonstrate respect for your materials and your audience—this mindset, more than any technical detail, distinguishes memorable handmade work in an increasingly crowded marketplace.

Anne Williams is a passionate crochet artist who finds purpose and expression through yarn and handmade creations. Driven by creativity and a love for the art of crochet, she transforms ideas into unique pieces, blending patience, care, and authenticity. Always eager to explore new techniques and inspire others, Anne believes crochet is a way to slow down, tell stories, and create beauty with meaning.